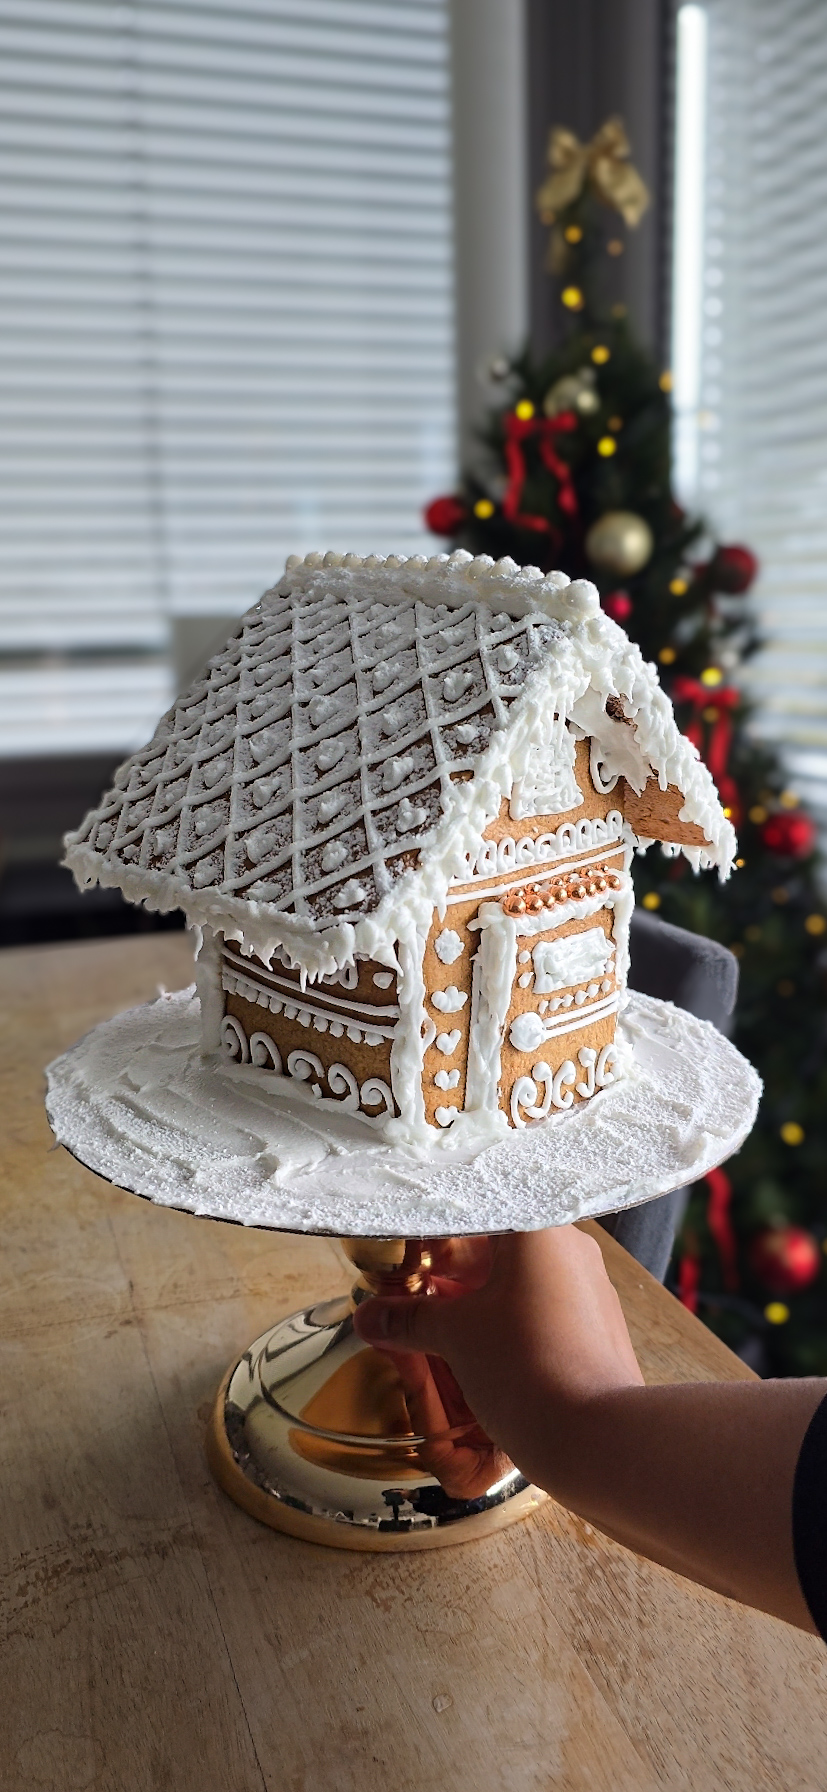
This hand-sized gingerbread house is sturdy, cozy, and built to last, no collapsing walls or sliding roofs. With exact measurements, a construction-grade dough, and thick royal icing “cement,” this is the perfect beginner-friendly gingerbread house for decorating, gifting, or creating a full festive scene.
There’s something quietly magical about building a gingerbread house. Not the stressful, collapsing-at-the-last-second kind, but the slow, cozy kind where the house actually stands, the icing behaves, and you get to lose yourself in tiny details like piped windows, snowy rooftops, and miniature forest scenes around it. This hand-sized gingerbread house was designed to be exactly that: sturdy, stress-free, and genuinely fun to decorate.
I wanted a gingerbread house that felt intentional but still approachable…no complicated templates, no architectural meltdowns, and no panic when the walls start sliding. This guide walks you through the exact measurements, the royal icing that actually works as glue, and a foolproof assembly order so your house stays standing while you decorate every little detail. Whether this is your first gingerbread house or your yearly holiday ritual, this one is built to succeed.
🍰 Why You’ll Love This Gingerbread House
- Sturdy and reliable – The dough is made for structure, so your house actually stands.
- No fancy templates – You just use a ruler and a straight edge to cut each panel.
- Hand-sized and manageable – Big enough to decorate properly, small enough not to be overwhelming.
- No-spread method – Chilled pieces and trimming while warm keep the edges straight and sharp.
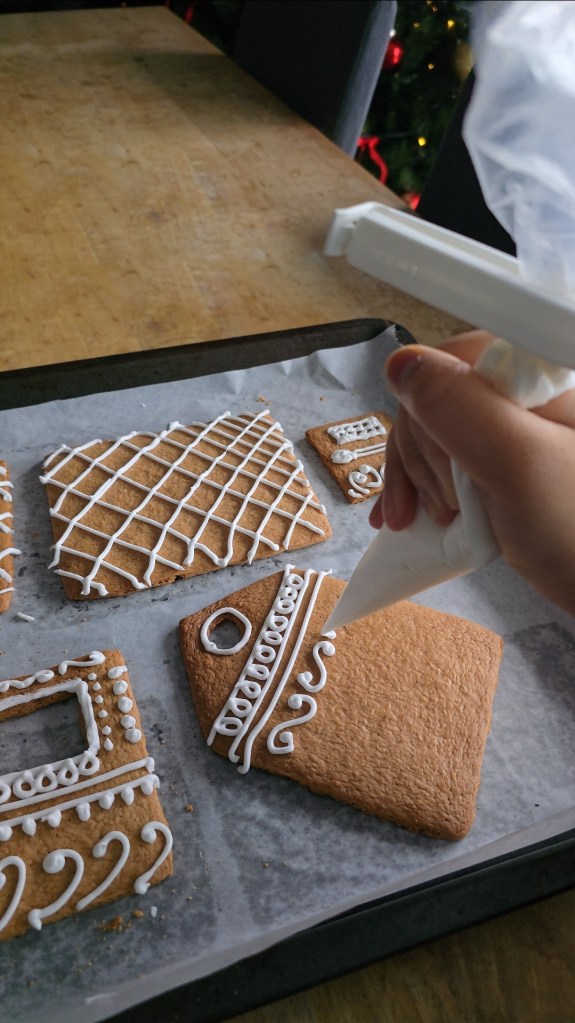
- One icing, two jobs – Thick royal icing doubles as both glue and decorative piping.
- Perfect for scenes – Extra dough becomes trees, logs, paths, and other tiny accessories for a full winter vignette.
Key Ingredients You’ll Need
- Flour
- Brown sugar
- Butter
- Molasses or dark syrup
- Ginger, cinnamon, cloves
- Salt
- 1 egg
Tips for the Perfect Gingerbread House
1. Chill the cut pieces, not just the dough
Refrigerating the shaped panels for 10–15 minutes stops spreading and helps the walls stay straight.
2. Trim edges while warm
Fresh from the oven, gingerbread is soft enough to reshape or trim for perfect edges.
3. Let the panels dry overnight
This transforms them from cookies into structural material.
4. Thick icing = strong house
Your structural royal icing should be toothpaste-thick. If it slides, add more icing sugar.
5. Build in the correct order
Back + sides → front → roof. Give each phase time to set.
6. Don’t overload the roof too soon
Wait 1 hour before adding heavy decoration.
7. Make extras with leftover dough
Trees, fences, paths, logs, chimneys—these make the whole scene.
FAQ
Why did my gingerbread spread?
Warm dough or not chilling the cut shapes. Chill pieces 10–15 minutes before baking and remove leavening agents.
How long does royal icing take to dry?
It crusts in minutes, fully hardens in 1–2 hours.
Can I freeze leftover dough?
Yes, for up to 3 month. Thaw overnight in the fridge.
🧊 Storage Tips
- Unassembled baked panels: Store uncovered overnight to dry.
- Assembled house: Keeps 3–5 days at room temperature.
- Royal icing: Keep covered with a damp towel while using.
- Leftover dough: Freeze airtight up to 3 months.

Ingredients
Yield: 4 walls, 1 roof (two panels) and accessories.
Bake Time: 10-20 minutes
Total Time: 2 days
For the Gingerbread Dough
- 350 g all-purpose flour (2 ¾ cups)
- 1 tbsp ground ginger
- 2 tsp cinnamon
- ¼ tsp cloves
- ¼ tsp nutmeg (optional)
- ½ tsp salt
- 115 g unsalted butter (½ cup / 1 stick)
- 150 g brown sugar (¾ cup)
- 120 ml molasses (½ cup)
- 1 large egg
For the Royal Icing (Glue + Decorating)
- 2 egg whites
- 440–520 g icing sugar (3 ½–4 ¼ cups), sifted
- 1 tsp lemon juice or ½ tsp cream of tartar
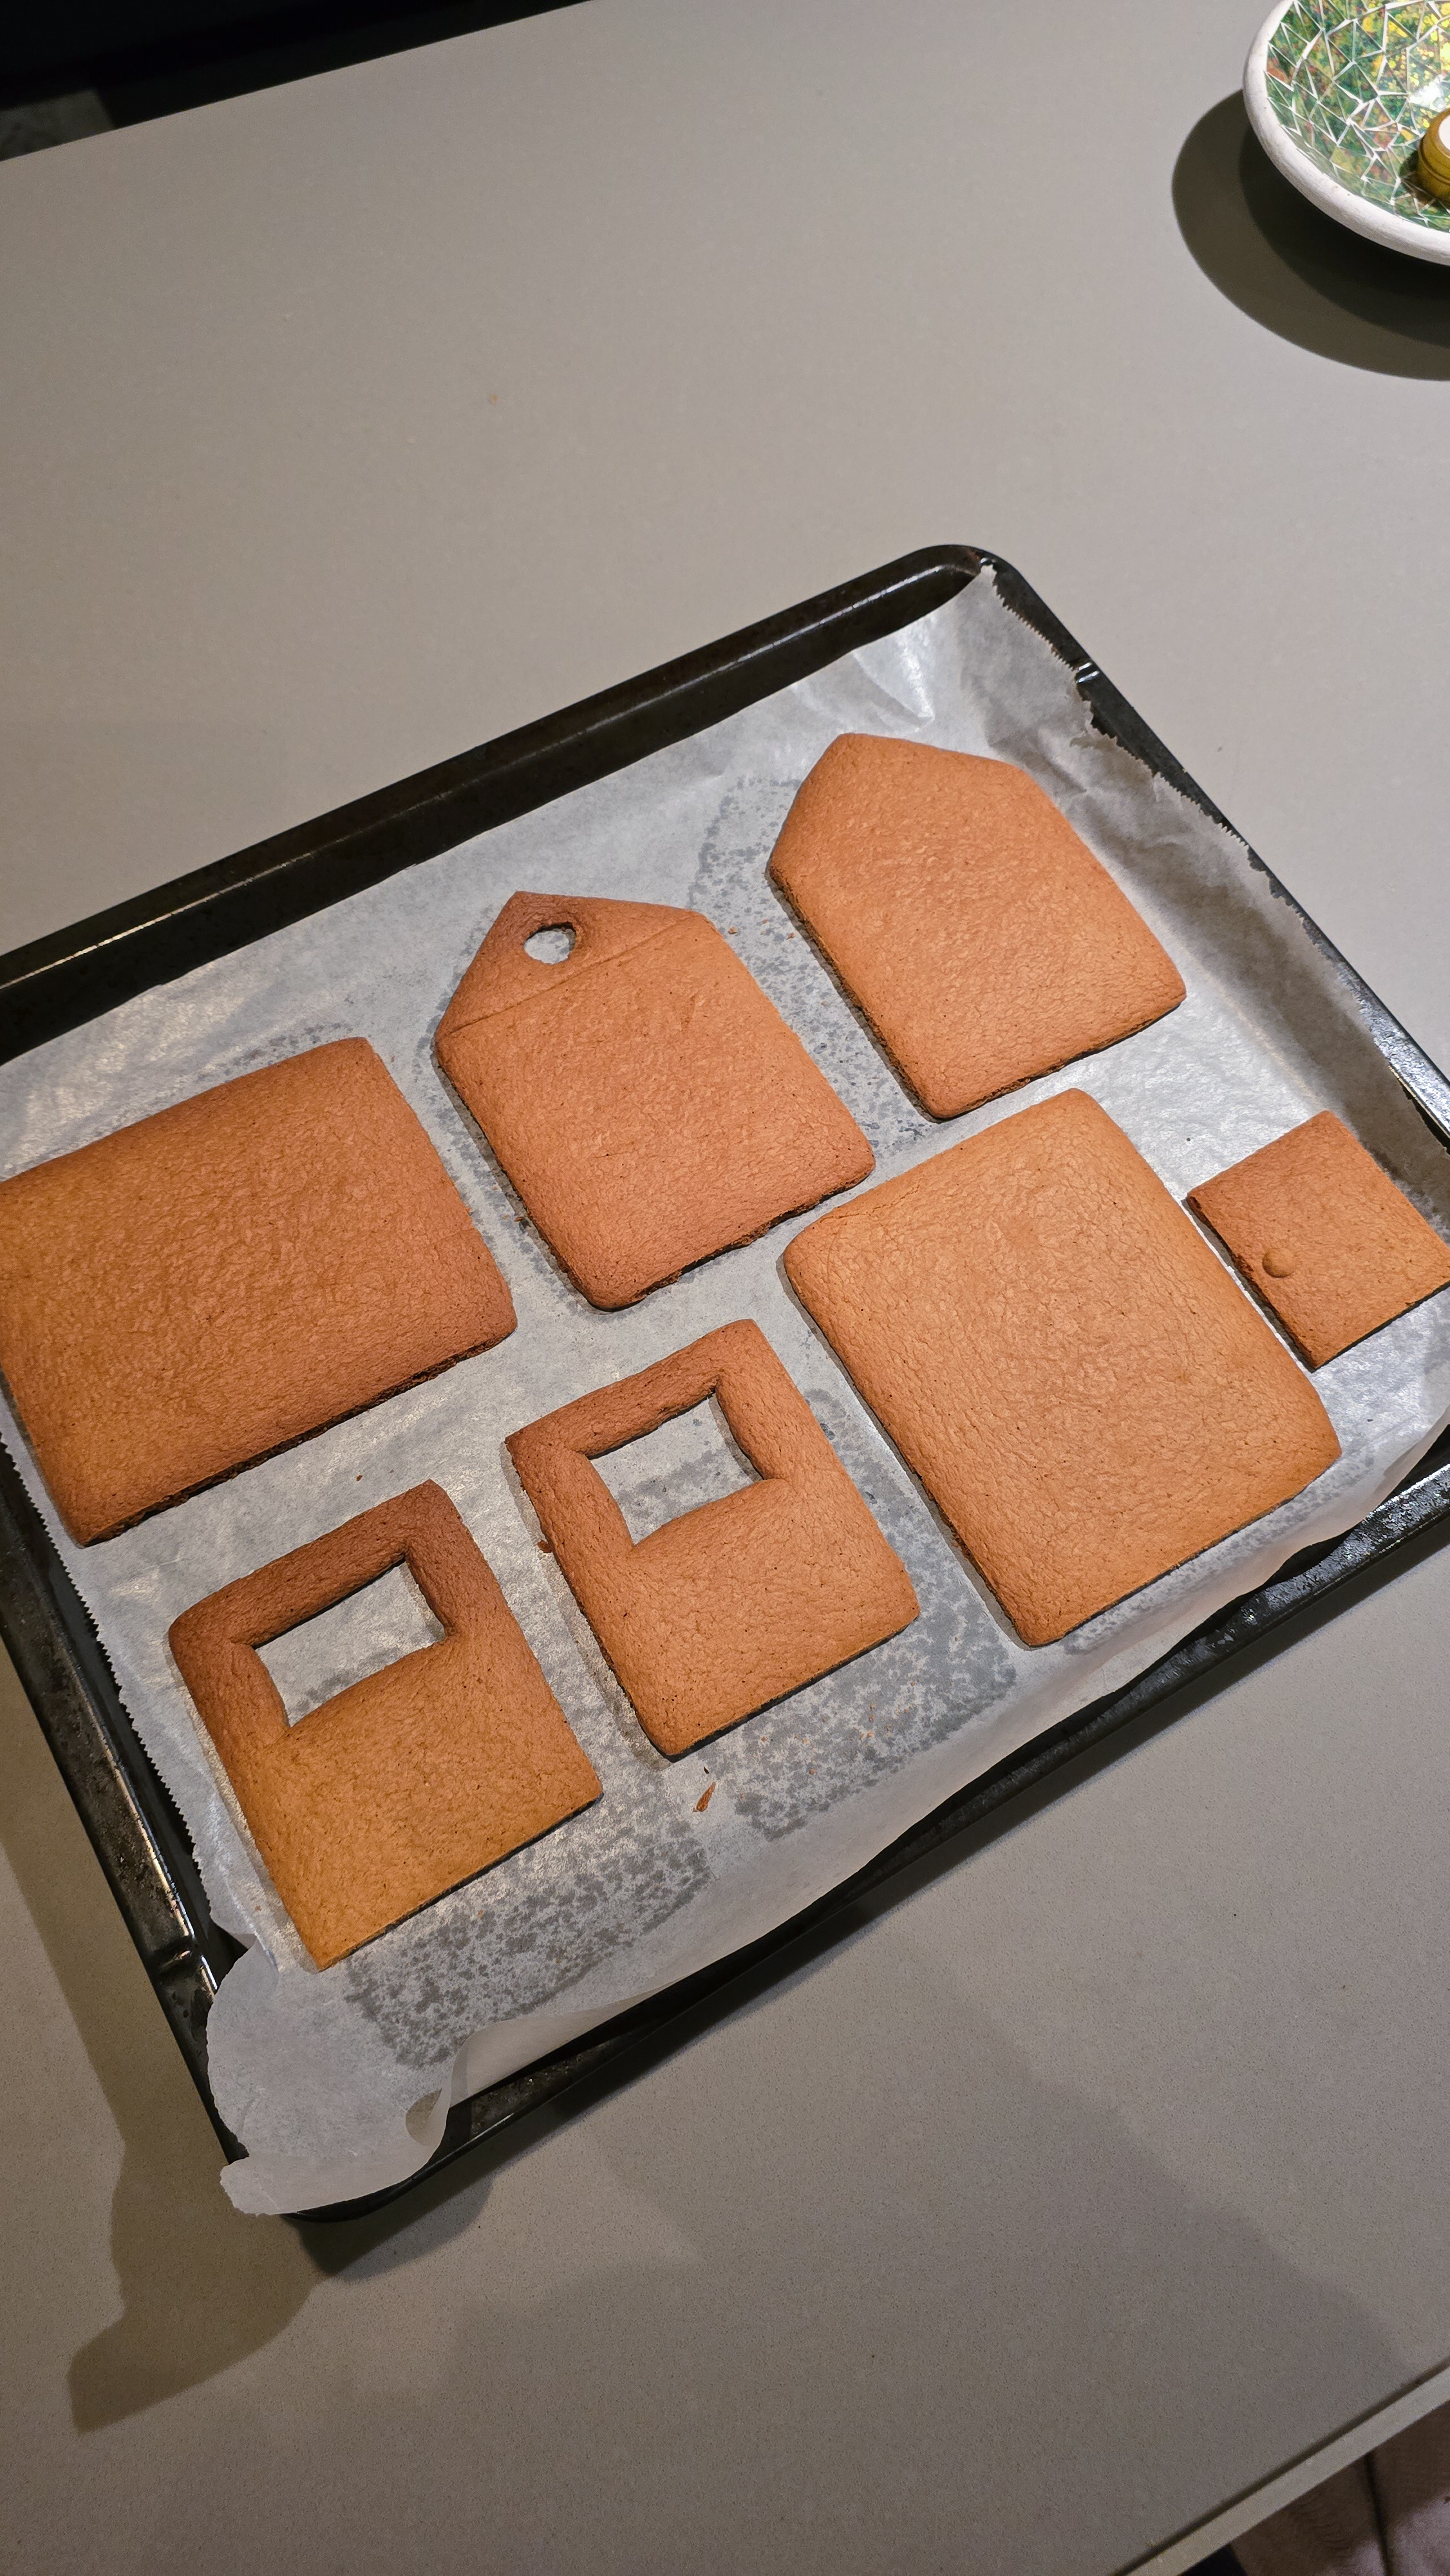
For the Gingerbread House Panel measurements
- Front & Back (x2)
- Width: 10 cm (4 in)
- Height of rectangle: 10 cm (4 in)
- Roof peak: +4 cm (1.6 in)
- Total height: 14 cm (5.5 in)
- Side Walls (x2)
- Width: 8 cm (3.1 in)
- Height: 10 cm (4 in)
- Roof Panels (x2)
- Width: 12 cm (4.7 in)
- Height: 14 cm (5.5 in)
Directions
- Make the Dough
- Whisk together flour, spices, and salt.
- In a saucepan, melt butter with brown sugar and molasses until smooth. Do not over-heat.
- Let cool 5–10 minutes until warm, not hot.
- Pour into dry ingredients and mix.
- Add the egg and mix until a soft dough forms.
- Press into two discs, wrap, and chill 1–2 hours.
- Roll and Cut the panels
- Preheat oven to 175°C (350°F).
- Roll dough to 6–7 mm thick. If possible, put the rolled out dough back in the fridge for 10 min.
- Use a ruler + knife to cut panels to the exact measurements above. Cut out windows and doors wherever you want.
- Transfer to baking tray.
- Chill the cut shapes 15 minutes.
- Bake
- Bake 10 – 18 min.
- Small pieces: 8–12 minutes
- Side walls: 12–14 minutes
- Front/back: 14–16 minutes
- Roof panels: 16–18 minutes
- They are done when:
- Edges are deeper golden
- Surface is matte
- They feel firm to touch
- Trim edges while warm for straight sides. Or use a metal or plastic scraper to gently push in edges if necessary.
- Let pieces dry uncovered overnight.
- Bake 10 – 18 min.
- Next Day: Make the Royal Icing
- Beat egg whites until frothy.
- Add icing sugar gradually.
- Add lemon juice or cream of tartar.
- Beat until thick, glossy, and stiff (hard peaks)
- Fill a a piping bag or Ziplock bag with 1/3 of the icing
- Assemble the house
- Pipe thick icing along edges of the back panel + one side wall. Then slowly glue all 4 wall together and stick then bottom to a cake board.
- Add roof panels.
- Use a small knife or spoon or you finger to smooth out the glue along all edges. Ensure everything is stuck together properly.
- Decorate
- Adds water drops little by little to thin out the leftover icing to consistency that’s soft and easy to decorate with (soft peaks).
- Fill piping bags with the icing and decorate your house!
- If you have leftover icing, cover the cake board with it to look like snow.
- Finish with a dusting of icing sugar snow.
What’s New

Try the latest in Other Desserts: Vanilla Bean Banana Loaf with Spiced Pear Sauce
Notes
Removing baking soda prevents spreading and keeps panels flat.
Always chill the cut shapes before baking.
Trim edges while warm for perfect architectural lines.
Leftover dough makes adorable scene accessories.

Leave a reply to Bakery-Style Sugar Cookies with Perfect Royal Icing – Lowen Cakes Cancel reply